| Home |  |
Time trialing |  |
General info |  |
Techniques |
| Driving tips |  |
Strats |  |
Terminology |  |
Miscellaneous |
Strats
If you're looking for the best strats: watch videos! Here you find many links to sites with videos. I don't write all strats out in here, as that would be very cumbersome and videos are so much clearer. Rather than that, I intend to point out the most crucial things to notice, give tips, and provide alternative (easier) strats.
Explanation
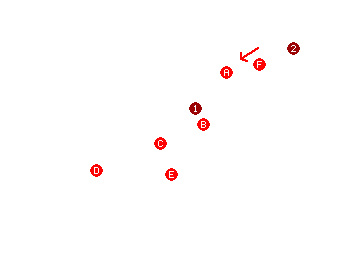
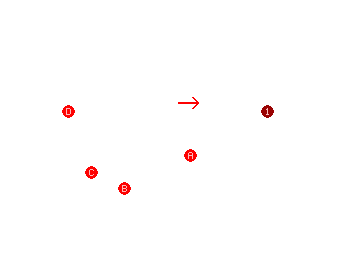
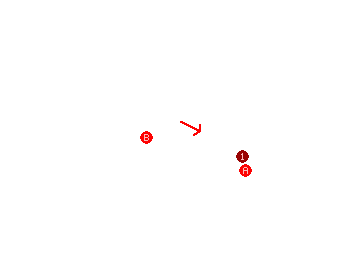
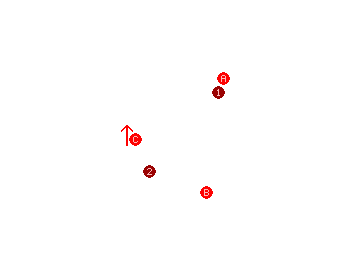
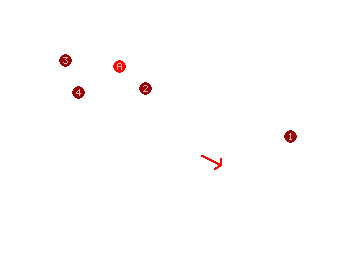
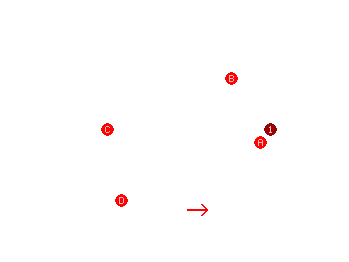
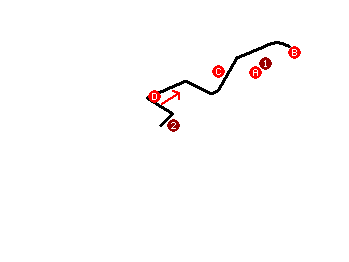
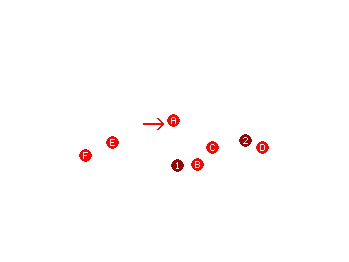
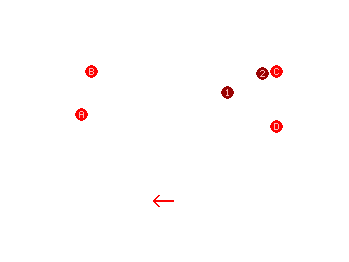
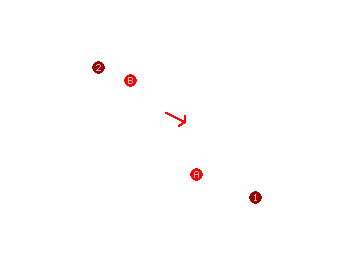
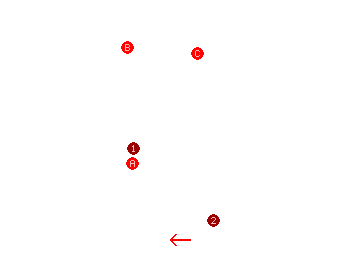
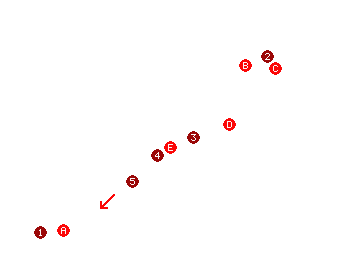
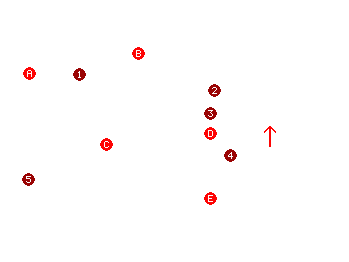
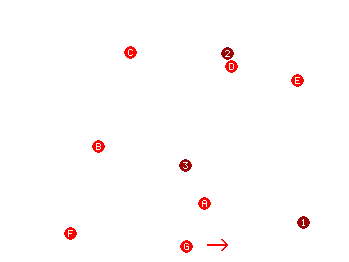
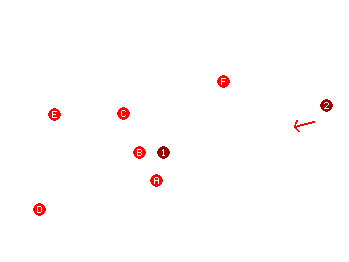
For each course there's a map, with markings on it. The arrow depicts the start/finish for clarity. The red dots containing letters match the descriptions below. The darker dots with numbers represents shroomspots.In the text, I use L for a left facing MT and R for right facing. SWB stands for sideways boost (see techniques).
Luigi Circuit
 |
||
| A | Go over the zipper at the outermost left, and go left as well. Try to hit the end of the wall slightly to land a fraction earlier. As you clear the zipper, immediately start preparing an L. Release it roughly when the boost of the zipper wears off. |
| B | As you approach the path of the chainchomp, prepare an R and slide over the curb (the light brown part). Don't release your MT until you've cleared the curb! Otherwise you'll pick up air when going over the curb, which is disadvantageous. Don't be afraid to cut off a little bit of grass when going onto the path; the slight drop in speed is compensated by the shorter driving line, and the MT will make you pick up speed again. |
| C | For the fast MTers, do two Ls on the path: try not to cut off through the grass, and for best effect, do the first L with A-tech. Easier is to do simply one L: let your previous R work a bit and do an L when the path goes slightly off to the right. |
| D | The long bend is best taken using the SWB technique. As you leave the path past the chain chomp with an R, try doing the L roughly on the middle of the road and use the SWB to glide toward the bend. Then do 2 Ls while staying as close to the sand as possible. Space them out well, and do a last L before the zipper. If you can MT fast, then do the 3 Ls with the SWB a little quicker and finish off with 2 normal Ls. Don't do that penultimate L with SWB, because that would make your kart face left too much when exiting the bend. Instead, make it a normal one, and very short, otherwise you get into the sand. |
| E |
On the long straight, the best strat is L-R-L-R-R-R. When using A-tech, go over the zipper facing left. Do L-R-L using A-tech while staying close to the left. Then with the first of the 3 Rs, roughly cross the middle of the road. Go toward the curb with the second, and the third one is done as close to the curb as possible. When not using A-tech, don't go too far to the left when crossing the zipper, as you'll need space on the left to do the R. If you're not the fastest MTer, say Expert or lower, try L-L-R-R-R. That's one MT less, but as you won't be doing an R, you can go and stay much further to the left after the zipper, making for a better driving line. Be sure to space your MTs out well if you're doing less MTs. |
| F | As you (almost) clear the bend with your last R, do an L. A-tech is ideal here as there's not much room on the right, and also gives the possibility to do another quick L (with SWB), but that's roughly Titan level. Without A-tech, wait a little bit until there's some room on the right. Then do a normal L, with SWB when going for the shroomspot, or a quick one without SWB for non-shroom. |
| 1 | Go over the zipper and do an L and an R very quickly and rapid succession. This requires very fast MTing though, and doesn't save a lot compared to just doing one R. So that's my recommendation if you're not Hero or higher. Shroom at the moment you cross the curb, roughly at the spot where there's a flower in the grass. During the shroom, prepare an R and release it at the moment you get on the chainchomp path. Naturally cut off as much as possible. |
| 2 |
Shroom along the last bend, not too early. Press left hard to stick to the wall like glue! Keep pressing left when you inevitably lose contact with the wall. Release an MT as soon as the shroom wears off. This should get you against or very close to the wall on the left. If you have the time, have an MT ready before you start shrooming. Otherwise, prepare the MT as late as possible. This shroomspot is superior to the first one, but the success of this one depends largely on how close you manage to stay to the wall. Players who are Advanced or lower may find the other shroomspot easier and more worthwhile. |
 | Back to top |
Peach Beach
 |
||
| A |
On the beach, simply SSMT away. Depending on your MT speed, do 4 or 5. You may get high water, especially in lap 3. A little bit of water is not bad, it doesn't slow you down. But as you get deeper, you'll find that even with MTs you go slow. So you might want to go off a bit to the right, by doing two Ls in succession for instance. |
| B | There's a small slope between the beach and the stone path. The top players release an MT right on this slope, and do the next R very quickly. This need not concern you however unless you're high-Titan or something. Otherwise simply slide over it, have an MT ready, and release it as soon as you clear the bend. Note that you can slightly cut through the grass without loss of speed. |
| C | Do an L coming off the stone path, but release it only after clearing the slight slope. |
| D |
The transition from the stone path onto the paved road is not smooth. Release an MT either well before it, or right after it. Doing it before is faster, especially when doing A-tech on the MTs on the paved road. Doing it after is easier, as you have more time to do an MT and prepare the next one on the turn toward the paved road. Release the MT directly after getting on the paved road and follow up with an L against the rock wall on the right. Note that, on the turn, you can again cut through the grass a little bit. |
| 1 |
There's really only one shroomspot on PB, where both mushrooms are to be used. After the 4th tree from the finish line, there's a path through the grass, between the trees and the rock wall. Deploy the first mushroom as you get on the grass. Try initiating the second mushroom just before the first one is about to wear off, to keep your speed maximal throughout. Stay close to the wall. At the last moment, prepare an MT and release it as soon as you get on the stone path. Ideally the shroom wears off at exactly that moment. If you find it easier, you can also slide while shrooming. For this, start sliding directly after deploying the first mushroom. This makes it easier to prepare the MT. You won't be able to cut off as much though. |
 | Back to top |
Baby Park
 |
||
| A | On BP, The cornering is very important. Prepare an MT on the straight, and at the exact right moment, press right hard to sharply turn around the corner. In the ideal case, you hit the wall, but only just a little bit. As soon as you clear the corner, release your MT. A feeling for the exact right moment to steer into the corner is something which comes with a lot of practice. |
| B | There are two strats: the 6MT strat and the 8MT strat (sometimes also called 3MT and 4MT). Naturally it's the number of MTs you do per lap, hence 2 or 3 on each straight. Doing 3 MTs required very fast MTing and is very hard. 2 MTs is of course easier, and sub-1'06 is very possible with it. Simply do an L and an R, and remember, as always, to space them out. |
| 1 |
For f-lap, the mushrooms are used around the corners. Use an MT with SWB to glide to the corner. As you get close to the curb, slide and shroom at the same time. Release your slide as soon as you clear the bend. Then go straight for a while. Release an MT as soon as the shroom has worn off, but wait with preparing it till the last moment. You'll be using approximately 1/3 of the shroom around the corner, and the rest on the straight. For sharper turning, use L-tech or R-tech (R-tech is best), but that shouldn't concern you until Titan level or something. Overall, the best f-lap strat is an R released on the finish line, an R toward the corner, shroom, L-R on the straight, R toward the corner, shroom, L before the finish. Even better is to quickly do an R with A-tech right before the finish line. For this, start your shrooming on the last bend a little bit earlier. However, this is Myth stuff; Titan is very possible without this. One step toward easiness is not doing the last R before the second shroom. So only do L-R on the straight between both shrooms. With this sub-9' is still very possible. |
 | Back to top |
Dry Dry Desert
 |
||
| A | When not shrooming, the best path is to cut through the sand here, with multiple MTs. There are other parts of DDD as well were cutting through the sand is beneficial. However, even with fast MTing, the sand still makes you slower, so leave it as soon as possible. Especially if you're not the fastest of MTers, you may be better off not cutting off too much, but to continue your path on the white sand. |
| B | This section is quite bumpy. The best driving line takes you over or past the first hill on the right; with A-tech you can simply go over it without a problem. Without A-tech go around the hill may be a touch better. This can be done by going wide a bit, or doing two consecutive Rs. After the hill, the path leading to the right of those two orange whatever-they're-called thingies is rather smooth. |
| C | It's good to know that the arch is standing behind the finish line. So you can end your 3-lap of f-lap attempt by bashing into it. Especially on f-lap, coming out of the sand with a mushroom, this may prove to be a useful bit of information. |
| 1 |
This shroomspot is the best one but a bit tricky. The shroom is just enough to cover the distance over the dark sand. Drive straight toward the dark sand, aiming slightly right of the tree. Especially when MTing right before going for the dark sand, you'll catch a small bit of air; this is good. Wait with shrooming until you've landed in the dark sand and your speed is down; you'll need whatever distance you can spare for your shroom. As you shroom, you'll see a patch of very dark sand on the right. Entering this will make you "sink away" (Lakitu will pick you up). Try going past this patch as tightly as possible. As soon as you clear it, turn sharply to the right toward the sinkhole. Don't try to cut off too much, as you won't make it. Prepare an MT during the shroom. As soon as you hit the lighter yellow sand, release the MT. Timing is essential, as it's easy to get stuck in the dark sand after the shroom, and no matter how briefly, that costs time. If you find the MT bit difficult, you can try the following: when entering the dark sand, first drive a bit through this. Roughly when you pass the tree, deploy the mushroom and cut off such a portion that you can enter the light sand almost straight. Practice a bit to get the timing right. If you just can't get this to work properly, you may want to do the other shroomspot instead. If you're desperate, you can use both mushrooms on this spot. With that, timing is not critical anymore and you can cut off much more easily. It comes at a high price though, so I recommend to just get this shroomspot to work somehow. |
| 2 | For this shroom, go underneath the billboard. Again wait until you've almost "settled" in the dark sand before deploying the shroom. As with the other shroomspot, don't be too greedy, as you can easily get stuck in the dark sand. For best effect, prepare an MT during the shroom and release it when entering the yellow sand again. |
 | Back to top |
Mushroom Bridge
 |
||
| A | It's possible to pass the cars in the tunnel on the inside. For that, MT against the wall. Pressing left to induce the SWB isn't really necessary. You need however to be aligned properly against the wall in order to stick to it, and not getting stuck to it at the same time. You also need fast MTing to make it work. Simply going around the cars is naturally much easier, and I suggest to do this until you get to Expert or something. |
| 1 | There are many shroomspots on MB, as there's no obvious one that saves a lot of time. From all of those spots, this one is the most common though. For one, because at roughly Expert / Hero level and higher, there are cars in the way of MTing in the tunnel at lap 2 and 3, so shrooming along the left of them is a very good option. But even in absence of cars, it's a good spot as it's an almost straight stretch but not fit for SSMTing because of its shortness. |
| 2 | A good second shroomspot for f-lap is going into the tunnel. As you take the sharp right-hand turn before it with an R, do an L and an R and then shroom toward the wall. With a shroom it's relatively easy to get aligned properly, as opposed to with an L. |
| 3 | If you want easy, and you're not brilliant with MTing against the wall in the tunnel, you can consider shrooming while sliding along it. |
| 4 | Yet another option is to shroom instead of doing the first of your SSMTs on the road. After you've done the last L after the tunnel, do an R alongside the wall, and shroom. Prepare an MT during the shroom, and SSMT after that. |
 | Back to top |
Mario Circuit
 |
||
| A |
This is a very sharp turn and you can easily get on the grass afterward if you're not careful. The best way to take the turn is by going over the grass. Bump into the wall for even sharper turn in. Go into the turn with an MT ready and release it roughly when you've cleared the wall (so when you're still in the grass). As you get back on the road again, prepare an L. Ideally this slide takes you nicely along the curb on the left. If you're going for the shroomspot, you need not turn in so sharply. See below for more information. |
| B | When you've cleared with the long bend to the left, stay on the left a bit. Do an R as early as possible, and then a quick L on the small bit of straight road toward the left-hand turn. If you're not a fast MTer and don't want to bother with this extra L, then simply go to the right and take the right-hand turn as sharply as possible. |
| C | The first part of the sand here is a bit bumpy. Exit the right-hand turn with an MT and let it work a bit. Prepare an L, but only release it when you've cleared the bumps, halfway through to the left-hand turn toward the finish. Especially on the 1st lap, you'll find a goomba in your ideal driving line. If you're fast enough, say with a 1st lap split of 33" or lower, you should be able to pass it on the right. Take the right-hand turn before the goomba section very sharply, and then try to squeeze through on the right of the goomba, but on the left of the upcoming grass. If you can't do it, try going around it. |
| D | The strat of the top players is to do a very quick R between the last corner and the huge "speed bump", then sliding across the bump, release an L on touchdown and go on. Apart from the quick R, it may be hard to do this consistently. The easy way is to simply exit the last turn with an L, go straight over the bump and prepare an MT, either as soon as you're in midair, or just before then. Make it an L or an R, whichever leads to a nice MT pattern toward the bend at the end of the straight. |
| 1 |
The one and only shroomspot. When going for a 1-shroomer, take the sharp right-hand turn as described above: over the grass, only now bumping into the wall isn't really necessary. Also, the MT is now best released when you've cleared the grass. There are two trees; you can either go between them, or on the right. Between is probably the fastest, but I personally have always found going around them easier. Experiment a bit. In both cases, drive on the grass a bit and don't shroom too early. Time gained here will inevitably be lost again on the other side. Shroom and slide, prepare an L for when you're out of the grass. Ideally the shroom should wear off just before you're out of the grass. If you still have some momentum when you get back on the road, you'll fly across it. If the shroom is over too early, you get stuck in the grass naturally. Release your MT as soon as possible, but be careful as too soon may send you back into the grass. When doing a double shroom, you need not wait with shrooming until you're in the grass; simply do it as early as possible. Then slide across the grass, as closely to the wall as possible. The second mushroom should be deployed quite early, well before the first one has died out. You need to keep your speed up, and you want the second shroom to be finished as soon as you're ready to release your MT. The double shroom will carry on until you're well on the road, so you'll end up on the right of the road. As a result, you'll be taking the following right-hand turn sharply and you may not want to bother with trying to do that quick L as described earlier. |
 | Back to top |
Daisy Cruiser
 |
||
| A | The fastest way around the pool is along the right. Just before you jump over the stairs, start sliding (facing right). Try to stay a bit on the left, because you'll need a wide turn to make it on the small path past the pool, and not in the water. As soon as the wall permits it, release the slide and immediately start preparing an L. This should get you on the path, against the wall. Do another L toward the stairs. |
| B | The stairs are tricky. Doing one or two MTs with SWB here saves time, but getting a good MT is not easy, and perhaps requires some luck. Especially if you're going for two MTs. Doing only one is a good compromise between speed and consistency. Start sliding down the stairs and get close to the inside of the turn. Release an L roughly one third into the stairs. Use SWB, and after the MT has worn off, start preparing an L at the bottom of the stairs, to be release after you've left the stairs. |
| C | The tables can be your worst nightmare. They unavoidably get in your way, especially at Titan level. If you're having troubles with moving tables, then try to find an MT pattern that enables you to dodge them consistently, or try to change your shroompattern (from 0-1-1 to 1-1-0 for instance). |
| D | At the end of a 3-lap or f-lap, go over the finish line on the outermost left to minimize your driving distance. In the first two laps of a 3-lap you need to cross over diagonally. Note also that this will cause a 3rd lap to be generally faster than a 2nd lap, so take that into account when you evaluate splits. |
| 1 |
As described above, start sliding before coming down the stairs, only this time you need not stay so far to the left (a shroom makes enables sharper turning). As soon as you touchdown, deploy the mushroom. As before, release the slide and start preparing an L at the right moment. Starting the first L at the right moment requires quite some accuracy, especially since the shroom makes you go faster than normal. Here's a method that I personally find easier: slide toward the pool as you would normally without shrooming. Release the slide, but instead of preparing an L, use the mushroom and steer left to go around the pool (no slide). When the shroom is almost done, prepare an L and release it before the stairs. |
| 2 | After the last turn to the left, stay a bit on the left. Prepare an R and release it as soon as you face the road toward the outside. As soon as your speed is about to drop again, very quickly after the R, start shrooming. During the shroom, prepare an R. Release it when the shroom wears off. |
 | Back to top |
Waluigi Stadium
 |
||
| A | This bump sends you high into the air. Try going over it while sliding at the outermost left: this will make you land earlier, and also gives you a comfortable amount of space and time to optionally do an R with SWB before the small bumps in the road. |
| B |
Going over the mud on the right is way faster than simply launching yourself over the zippers. There are many ways to take the mud. One is to come in with an R in the bank. Slide onto the mud and release the MT when you've cleared the billboards. You'll want to be getting on the mud as late as possible, naturally because mud makes you go slow, but also because of the risk that you get stuck against the billboards. Come in too late and too wide, and you'll fly off the mud again and toward the zippers. The bumps on the road leading toward the turn don't make things easier. It may require a lot of practice and feeling to get it right consistently. When you're on the mud, you can simply go straight and do an R around the turn at the end. An upgrade is to do a quick L on the mud. Yet another option is to take the sharp at the end so wide, that your back wheels go over the sand of the bumps. This will make you go faster, but is a little bit tricky. Another completely different option is to not get in the mud early, but to take the turn toward the zippers very wide. Release an R and try to aim it so that you go on the mud just before you hit the zippers. Touching the zippers makes you fly off into the air which is not good. Ideally you do jump up, but only a bit, which carries you a bit further up in the mud. On the mud, simply prepare an R again for the upcoming right-hand turn. This turn should be taken on the mud, as sharply around the billboards as possible. Release the MT on the mud itself, and do an L when you're back on the road. |
| C | While flying in the air, prepare an L for when you land. However, prepare this L as late as possible. Preparing an MT makes you drop faster, so preparing this MT too early makes you land on the bridge itself rather than the ramp, causing you to bump. You don't want that. |
| D | The easy option here is to go around the mud pool. It is possible to cut it off without a mushroom, by doing one or two MTs half on the mud, half on the sandy wall. This is very difficult to do consistently in such a way that it saves time. Don't bother with this unless you get to Titan or something. |
| E |
On this bumpy section the best driving line is in the "gutter" on the outermost left, where there are no bumps. Coming out of the left-hand turn with an L, get in the gutter with an R. It's possible to do a quick L right before taking on the following U-turn, but if this makes you inconsistent, then don't bother with it (or maybe only in f-lap). For the U-turn, prepare an R and get the blue sparks while staying in the gutter. At the right moment, turn in sharply. |
| F | Taking this turn with an L requires a lot: the MT coming out of the U-turn must be released at the exact right moment, and the MT itself must be done extremely quickly. If all goes well you don't hit the mud on the left and don't hit the pile of sand on the right either. Hitting either results in a major loss in time. Much easier is to simply slide briefly, without MTing. If you find that you're inevitably going to end up in the mud, because the U-turn didn't go well, then do try to do an MT (in the mud) to ease the pain. |
| 1 | Go into the mud as described before. Start shrooming as early as possible. While shrooming, start preparing an R in the mud (a bit tricky). Try to get at least orange sparks when you have to press right hard to the take the U-turn at the end. The shroom will carry you all the way to the left of the road. Get your sparks blue an release the MT on the left of the road. Do an L before the zippers; if you're far enough on the left, you don't bump due to the hollow in the middle of the road. |
| 2 |
After landing, go straight for the mud. Start shrooming at the exact moment you enter it; the shroom is just long enough to cut off the mud pool completely, but there's not much margin. Stay close the wall on the left. For best effect, release an L with SWB when exiting the mud. This shroomspot is probably inferior to the previous one if you can cut off the mud pool without a shroom, as described above. If you can't, then they're about equal in terms of time gain in my opinion. However, I find this one quite a bit easier, and maybe you'll find that too. |
 | Back to top |
Sherbet Land
 |
||
| A | The ice sure has an effect on driving, especially with MTs. Doing an extra R on the ice here is possible, but not very profitable if it's not very fast or with A-tech. Otherwise an MT might actually slow you down, especially if you have to dodge those ice-skaters as well. By the way, the effect of A-tech is diminished here as well, so release A for a long time to get any effect out of it. |
| B | You can do an R with SWB here, or even two if you're feeling lucky. Note that sliding over the icy ramp does not slow you down. |
| C | This is corner is best taken by cutting off through the snow. Use an R with SWB to get onto the snow, then prepare an R for when you get back on the road again. Top players even find time to do an extra R in the snow. The ratio of time gain versus difficulty is however such that I suggest waiting with this strat until you get to Hero roughly. The alternative strat is to simply stay on the road and turn sharply around the curb. |
| D | Again, MTing on the ice is not so effective as normally. You slide all over the place. If you're looking for fastest, do an R getting on the ice, then R-L-R, R around the last turn and on toward the finish line, as you'll see in videos from top players. One step toward easiness is not bothering with that last R (R-L). Very easy, but still quite good, is to do only one R: do an R getting on the ice, and go straight for the icy tower on the right. By going this far to the right, you'll have plenty time to prepare an R, which makes you veer off to the left again. After this R, go straight for the next tower again, and do an R around the last corner before the finish. |
| 1 | After exiting the sharp left-hand turn, steer toward the snow and deploy a mushroom at the moment you hit the curb. Try to go over the curb with an angle to decrease the risk of bouncing. Unless you're going for a double shroom, exit the snow roughly at the point where the curb bends to the left. |
| 2 |
This shroomspot works best in conjunction with the previous one. During the first shroom, start a slide to prepare an R. Allow yourself to get close to the curb again (you need to come in wide for the next corner). Try to stay on the snow; don't go back on the road. Deploy the second mushroom roughly when you're closest to the curb, and steer sharply around the fence on the top. Release an R when you get back on the road again. There's not much difference between using one mushroom in two laps, or both in one lap, when it comes to 3-lap. A double shroom is probably a tad better, but do whatever you find easier. |
 | Back to top |
Mushroom City
 |
||
| A |
There are two junctions where you can make a choice of direction. Practically everyone goes right on the first junction, and then straight at the middle one, so right-(left)-straight-(right)-(left) (the parentheses denote forced directions). I'll try to explain why. First off, there are two sections with pillars. If you go right-(left)-right-(left)-(straight) or straight-(right)-left-(right)-(left), you'll cover only one section. However, you'll need to cross through between the pillars, and on such a small section that's not optimal. The disadvantage of going straight-(right)-straight-(left)-straight, is that you'll only be taking two turns, while MTs are served best around corners. Also, if you draw straight lines between the insides of the corners you take, you'll find that with the right-(left)-straight-(right)-(left) strat you obtain the shortest distance (I'll skip the mathematical proof). Did that make any sense to you? It doesn't matter, you shouldn't be listening to me anyway. You should be experimenting yourself! For example, you might dislike dodging the pillars. Or maybe you can even vary in all 3 laps if it helps dodging cars. Go and play. |
| B | Set your priorities: doing a quick L with SWB here is not as important as taking the next two bends sharply. If this MT makes you go wide on either one, you're probably better off focussing on taking them sharply than doing that MT. |
| 1 | There's a lack of good shroomspots here. This one is not easy since this straight stretch is rather short. As soon as you clear the bend, shroom immediately. Prepare an R while trying to stay on the right (a bit tricky) and release it when you clear the wall on the right. Ideally the shroom has worn off by then. |
| 2 |
The merit of this shroomspot is that it makes for a good driving line. After your last L has outlived its usefulness, shroom. Prepare an L and try to fluently wind up against the wall along the bend. This shroomspot is probably a touch better than the other one, and I personally find it easier, too. |
 | Back to top |
Yoshi Circuit
 |
||
| A |
The well can be jumped over without a mushroom. For this, release an MT on the road, well before the grass. With enough speed and the right direction you'll make a slight hop on the other side of the well. During this hop, start preparing an MT and release it as quickly as possible to pick up speed again. This is essential, otherwise going around the well may be even faster. This trick can save a few tenths or several, depending on how well the hop goes. However, doing this is not worth it until you get to Hero or something. First build up consistency on the rest of the track. If you're not consistent yet, you'll be wasting a lot of time trying to make it over the well, only to lose those tenths again because of mistakes further down the road. Start doing it only if you have the ability to cash the advantage in! |
| B | After your last R along the long bend in the tunnel, stay to the right a bit and do an L as soon as possible. Then do a quick R with SWB toward the following right-hand bend and another R coming out of it. Doing that extra R is not too easy, so you might want to skip that until you get to Expert or higher. In that case, simply take the left-hand turn as sharply as possible instead of staying on the right. |
| C | Here's a small bit downhill followed by a flowerbed sticking out from the right. The best strat is to release an R on the top of the hill, a quick L on the slope and then another quick R around the flowers. Even better is to do that last R with A-tech, so that the L can work a bit longer. This is difficult though; it requires fast MTing and a perfect driving line to not bump into the barrier around the bed or going off into the grass on the left. If you want easy, forget about the L. Do an R on top of the hill, and simply prepare another R when coming down the slope. This way you might even find time and space to do a quick L before the upcoming U-turn, but that's not trivial either. |
| 1 | Do an R toward the well and shroom to jump over it. For best effect, prepare an L and release it on the road as soon as the shroom wears off. You need to go over the well in a good line to be able to do that, otherwise not MTing is not much slower. |
| 2 | Go over the path of grass between the big flowers and the rock wall with a mushroom. At first, go straight and steer sharply around the bend, and then slightly toward the road again. At the last moment, prepare an R and release it right on the road, at the time the shroom wears off. |
 | Back to top |
Donkey Kong Mountain
 |
||
| A | Right before the cannon you could do a quick R. This makes you enter the cannon a bit to the right, which is where you want to end up at the top of the mountain. It doesn't save too much time though, so skip it if you like. |
| B | While you're flying in the air, press up. This will make the "nose" of your kart point down, so that you'll land faster at the top of the mountain. You need not push up all the way, just make sure the nose is down as far as possible when you reach the top. |
| C |
A tricky hop, as it's easy to fly off into the air and lose a lot of time. Take off far on the right. Sliding / preparing an L helps to minimize your air time even more. Release the MT right before you land, as MTs here tend to cancel out when touching down and an air MT smoothens the transition from air to road. An easy path down the hill without many bumps is to stay on the right, close to the wall. |
| D | Bumpy! MTing here is not going to help you if you cannot manage to dodge the bumps here. If you don't have the consistency for this, simply cross the road going straight (still avoid the bumps of course). |
| E |
The big one. Undoubtedly one of, if not the, most difficult yet time-critical tricks in MKDD: jumping the gap. Going around it is still slower than the most crude of jumping techniques. Yet jumping the gap crudely and perfectly are also seconds apart. I'm gonna give several techniques in increasing speed and difficulty. For all techniques taking the right-hand U-turn with an MT is not recommendable: simply slide, because increased speed means increased difficulty! Go wide Take the last U-turn to the left very wide; you're gonna need the space. Slide, but don't MT! Then do a right facing slide, again going wide, partially up the hill on the left. Try to come out of the slide perpendicular to the edge of the road. Be sure to release R before you go over the edge! Using a mushroom here may help to improve your chances of making it, but is otherwise not a great shroomspot. Brake hard Slide around the U-turn, and when you're about to finish sliding, release A and hold B. This will make you (almost) stop. Then negotiate the jump at lower speed (that's easier): Slide to get perpendicular to the gap (get out of the slide before jumping) and you should have enough speed to make it to the other side (or use a mushroom). Barrier tech easy A better way to lose speed is the following: slide toward the U-turn, but turn in too early and sharply so that you hit the fence (the barrier). Try to hit the fence roughly in the middle of the last section (between the last and the penultimate pole), and at an angle of about 45 degrees. L-tech or R-tech could help here. If all goes well, hitting the barrier makes you jump back, and you land right at the edge of the fence, at the inside of the U-turn. Your speed will be very low, as before, but your driving distance is shortened and your line toward the gap is better too. Hitting the barrier correctly requires some precision though. Release A As you slide around the U-turn, release A. When you finish the U-turn, release R and (almost) simultaneously press A again. This will make you lose some speed, depending on how long a time you leave between releasing R and pressing A. Higher speed is profitable, but makes the gap a bit more difficult to make. Taking the U-turn wide also makes things easier. Brake Similar to the previous one, but braking (while holding A!) makes you turn in sharper as well. Top players are able to turn sharply around the U-turn while still making the jump with this tech. Barrier tech hard As with the easier barrier tech above, hit the fence (barrier). Now while you're in the air, release R, then press R again in combination with right. If you manage this before you touchdown again, you won't lose any speed! As soon as you touchdown, press left to slide in a straight line. At the right moment, press right to go to the gap. This is very tricky. You need to hit the barrier almost perfectly to make it. Then there's a quick chain of events (releasing R, holding R and right, touchdown, press left). After that, you need the perfect driving line if you want to make it over the gap. |
| 1 |
There are many shroomspots on DKM, for one because there are no obvious ones, and secondly because DKM is a very hard and inconsistent course to test the effectiveness of the various spots. The first possibility is to shroom around the long bend, as you can't MT here anyway. It's a bit short though, so doing that last quick R as described above won't be possible. |
| 2 | When landing on the top of the hill, shroom while sliding around the bend. |
| 3 | Coming out of the left-hand bend, shroom on the small straight stretch, and use part of the shroom around the U-turn. The shroom enables for sharper cornering, but may affect your gap jump technique. |
| 4 | Shroom on touchdown after clearing the gap. This works best if you manage to land close to the fence on the left, and already facing the path toward the finish line a bit. |
| 5 | If you can't MT on the bridge, then shrooming sure is easy. Try to stay in the middle of the bridge, and the swaying of the bridge can cause a bumpy ride which would be a waste for your shroom. |
 | Back to top |
Wario Colosseum
 |
||
| A | Taking this turn sharply with an MT ready is tricky. When sliding toward the turn, try to get orange sparks. Then turn in toward the bend, and finish the MT afterward. Preparing the MT before can easily lead to a wide turn. Another possibility is not MT around this turn at all, but to do a quick R followed by an L and an R with A-tech. This is trickier though in my opinion (and requires A-tech). |
| B | Directly after taking off from the big ramp with the zippers, start preparing an MT; this will make you drop faster. Release it just before you make touchdown. |
| C | Doing an MT here is possible, but is not going to save time unless your driving line is very good. Not doing this MT also gives you ample time to prepare for the upcoming turn to the left. |
| D |
This spiral is sharper than you can slide, so L-tech, R-tech and/or braking can be used to good effect here. Try to stay tightly against the wall, but be careful as L-tech / R-tech can easily cause you to get stuck against the wall. When falling down after the spiral, prepare an MT and release it before you land. It will cancel if you touchdown. Try to start sliding even just before you make air to drop even faster. |
| E | In this big area going around the gap with MTs is definitely faster than going over the boosters in the middle: the main acceleration you get from the first one is up in the air, and in midair you go very slow. Going around the gap on the right is preferred, because you're coming from the right already after the last turn, and the following turn to the left is best taken coming in wide. |
| 1 | Shroom directly after you land and slide around the corner. When the shroom has worn off, do R-L-R as described earlier. |
| 2 | This shroomspot works best in conjunction with another shroom at the end of the spiral (see below). Start sliding and using your favorite spiral-tech for a short bit into the spiral. Then shroom while still using L-tech / R-tech. If you find yourself going wide, then try to slam the brakes (B) quite hard so that your kart aligns more toward the inside of the spiral. |
| 3 | When almost at the end of the spiral, just before the road is "asphalted" again, shroom while sliding. As soon as you clear the spiral, go straight for a short while and then start preparing an R to release after the shroom is over. Try to wind up at the right of the road so you can take the next sharp left-hand turn tightly. |
| 4 | If you can't get the air MT described earlier to work here, this is a good spot to shroom. Simply shroom directly after touchdown. |
| 5 | MTing on this bit is not optimal because the road is neither straight nor very bendy. So using a mushroom instead of two MTs is a reasonable option here. |
 | Back to top |
Dino Dino Jungle
 |
||
| A |
Mind the small dip that follows the right-hand turn. Be sure to not release an MT until after you've cleared it. The fastest way is going through the dinosaur's legs with an R (and an L before that). Naturally it's a bit tricky, while going around with L-R is not much slower. |
| B | Doing R-L-R in the small cave here requires fast MTing and a good driving line. Skipping the R makes things much easier but not much slower. Be sure to let both Ls work though. |
| C | Doing a quick L on the bridge is tricky, but very timesaving, so try if you can. I find it works best if I do that L directly after releasing the R coming out of the bridge section with the boosters. |
| D | The short-cut over the wooden ramp can be taken without a mushroom, but is most likely the most difficult trick in MKDD. It's done almost exclusively by top players, and even they don't all do it, and if they can, they sure don't make it too often. The idea is to drive over the very edge of the bridge on the left, so that you almost fall off. The character on the back of your kart will act accordingly. Doing an MT on the edge improves your chances of making it. Do not attempt to do this trick until you're Myth or so! |
| E | When not going for the non-shroom SC, simply drive along the geysers. Try to stay on the right for the best driving line. |
| F | MTing (R-L) on this bumpy section is tricky because you need to keep a good driving line while sliding around. Below Hero / Expert you might want to not do that R: simply go straight over the first bump, then start preparing an L and release it only after clearing the third and last bump. |
| G | The best way to pass the geyser section is to do a quick R right before it, in such a way that you cross over right between (the bumps of) the left two geysers, while preparing an L. The easy alternative is to simply go straight, go right through the middle and do an L after that. Going off slightly into the air can help you prepare an MT before landing. |
| 1 | Slide and shroom around the long turn to the left while staying as close as possible to the fence (go over the grass). Exit the slide at the right moment and use the last part of the shroom sliding toward the following turn to the right (and prepare an MT). |
| 2 | Naturally the best shroomspot. As your shroom won't help you when you're in midair, start shrooming as early as possible. Come out of the previous corner with an R and deploy the mushroom immediately. |
| 3 | If you're not able to MT on the bridge here, and you find the first shroomspot very difficult, then shrooming on the bridge is a reasonable alternative. |
 | Back to top |
Bowser's Castle
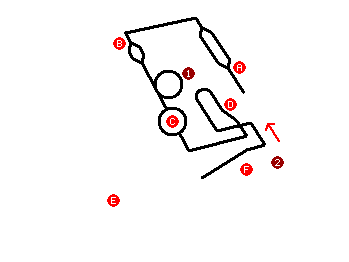 |
||
| A | From the two possible ways, the left one is probably a bit shorter because of the upcoming turn to the left. However, this difference is very small and you should just choose the one which is most optimal concerning the thwomps. |
| B | After leaving the left-hand turn with an L there are a few options: the most common strat is to do a quick R, than an L passing the gap in the middle on the right (best done with A-tech), optionally followed by another quick R before the zippers. That first R before the gap must be done quickly, and can be a bit tricky. Easier is to forget about it, let the L from the turn work out, and follow up with the L around the gap. This doesn't require fast MTing, and can be done consistently quite easily. Yet another option is to pass the gap on the left, but going around the right makes it easier to get a good line toward and over the zippers, and on to the spiral. |
| C | Depending on the positions of the flames, it is possible to do an MT between two flames, either by sliding through, or MTing before going through. Naturally this requires good timing, which comes with feeling. It's also possible to squeeze through between the pillar in the middle and the innermost flame, but that gap is even smaller than between two flames. |
| D | The section toward the U-turn is a bit uphill, with a small plateau about halfway. Start sliding (facing left of course) just before you reach this plateau. Press right at the right moment so as to go as straight as possible. The key is that you don't want to be going to the left too much, but you also don't want to hit the border on the right. Prepare an MT and steer left sharply around the U-turn. |
| E |
Taking the short-cut is not difficult, but taking it optimally is a different story. Have an L ready and slide over the gap. Try to slide parallel to the road and jump off far on the right. Just before you take the gap, press left. The idea is to slide sharply around the border on the left. Ideally you slightly bump into it. If you find a fireball shooting over the gap at the moment you're coming, you're in trouble. It is possible to dodge the fireball by taking the short-cut as far right as you can. But first try to change your shroompattern, for example from 0-1-1 to 1-1-0, to try and change the timing. If you have fireball trouble in lap 1, then try to dodge it, or if you're desperate, use the other inferior shroomspot on lap 1. |
| F | While in the air, start preparing an MT. Release it just before you land; the MT would cancel if you touchdown. Be careful: only start preparing the MT roughly after the highest part of the jump, since preparing an MT makes you drop faster, and preparing too early sees you not making it to the other side. |
| 1 | Around the spiral, shroom so that the shroom wears off at the moment the spiral is over. The moment to start is roughly marked by the chain you can see hanging from the ceiling. |
| 2 | After landing from the jump (preferably far on the left), go toward the end of the border on the left, either by driving straight or sliding for a short while. As soon as you reach this point, start shrooming. Try to get close to the trench on the left. Start preparing an L to be released back on the road. Try to cut off much, in a straight line, but not too much, because you don't want to get stuck in the mud. |
 | Back to top |
Rainbow Road
 |
||
| A | The best way to take this U-turn is by slamming into the crash barrier: slide in wide, and hit the fence a little bit for its end. The earlier you hit it, the sharper your turn will be, but too early and you end up driving back. After you've cleared the turn, finish your MT (if you haven't already) and follow up with an L. |
| B | After clearing the zipper, press R and left/right to drop faster. No need to do an MT. Do the same after the 3rd zipper. On touchdown, do an MT as quickly as possible to pick up speed again. |
| C | The fastest way to take the spiral is to slide all the way along the inside, hitting only the zippers on the inside lane. This is a bit tricky and requires practice to stay in the correct driving line. Otherwise simply go straight. There's no need to take every zipper, since a zipper gives you top speed for a certain amount of time, so taking a lot of zippers simply increases your driving distance without increasing your speed. When going straight, again take the zippers on the outer left lane. You can also take a zipper in the middle lane between two inner lane zippers that are a bit far apart. When sliding around the spiral, it's easy to exit the spiral with an MT. If you're going straight, either try to go over the last zipper sliding and prepare an MT, or take the very last zipper on the right. |
| D | You can slightly cut this corner, i.e. sliding off the track, so that your rear character goes "Whoa!" or whatever it does. Cutting off slightly is beneficial, overdoing makes you bounce and lose time. And exaggerating a lot makes you fall off the track, naturally. |
| E | While in the tunnel, press up a little bit to bring the nose down a bit, but not too much. When you exit the tunnel, and start dropping, press and hold up all the way to the ground. This will reduce the risk of bouncing. Pressing up in the tunnel will make you land earlier, but too much will make you land before the zipper, which is of course not your intention. |
| F | There's the option to do an MT right before the zippers. This is quite tricky and does not save a lot of time, since you still have quite some speed from the last zipper (unless you've missed it of course). So feel free to skip this MT until you get to Titan / Hero. |
| 1 | Shroom around the first U-turn. Optionally do an L with SWB toward the turn right before shrooming. Clear the U-turn, optionally with the aid of L-tech / R-tech. Go straight for a bit and then prepare to slide and slam into the fence at the second U-turn, as described above. This shroomspot can be a bit tricky to perform correctly, but then it's about equal to the other shroomspot. |
| 2 | Shroom around the spiral, in about the same way as on WC. Start taking the spiral with your favorite spiral tech. Try to time your shroom so that you still have some shroom left for the small straight before the finish. Slamming the brakes hard before shrooming can help taking the spiral sharply. |
 | Back to top |